
In this tutorial, let’s have a look at how to manage users and groups in Linux. Particularly we will be looking at the following 10 concepts.
- Different types of user accounts,
- 4 Main files in Linux that hold information about user and group accounts
- How to add a new user,
- How to set and reset passwords,
- How to delete a user,
- How to add a group,
- How to delete a group,
- How to add a user to a group,
- How to delete a user from a group, and
- How to lock a user account.
I have divided this tutorial into 2 parts. In part 1 we will be looking at the basic concepts such as
- the need for user accounts and groups
- different type of user accounts in Linux and
- the 4 important files in Linux that holds information about the users.
If you are interested in a particular section, you can jump to it using the table of contents below. You can scroll down to the end if you need to get to the next part of this series.
I strongly suggest you try out these commands as you learn them, as it certainly helps in the memory strengthening process (at least for me it did!!). But you can always bookmark this page and come back to it when you need to!
okay let’s begin!
Need for User Accounts
User accounts satisfy the following needs
- To have a secure sandboxed directory structure where the user can store his files in by having separate home folders for each user will make sure that they don’t need to worry about other users having access to their personal files and data.
- Each user might be comfortable with a different desktop environment, some may prefer KDE Plasma while others may prefer GNOME, while some other users may prefer XFCE Desktop environments. Giving this choice through user accounts can make their experience more enjoyable!
- It makes the life of the system admins a bit easier, as this gives more control over what each user has access to!
If the 2nd point above does not make much sense to you, I suggest you read the article below which I have written recently explaining the basics of Desktop environment and different classes of them.
Linux Distros vs Desktop Environments: Differences Explained!
Next let’s have a brief look at the different types of user accounts.
Different types of user accounts
There are 4 main kinds of user accounts in Linux,
- root,
- administrator,
- standard user, and
- service user.
Let’s have a brief look at each kind.
Root
This is an account created automatically for you at the time of the installation of Linux on your machine. The root is the user with maximum privileges and simply cannot be deleted.
Administrator
These are users who can do whatever root can do by simply prepending the term ‘sudo’ to commands. I am sure you have come across instructions to install software that goes like this “sudo apt install <some software name>“
Usually in organizations that use Linux as their main operating system, the so-called “IT guys” or “System Admins” will hold user accounts with “administrator” privileges. This is to ensure that the employees will not be able to do something that might render their systems “broken” which might cause some undesirable downtimes or “vulnerable to attacks” which is even worse as it opens the door for the possibility of industrial espionage attacks which could result in valuable data getting stolen!
Standard user
These are regular ordinary users, like human resources, sales, marketing, management and other office personnel. They just need a secure and working system to write documents in and browse the internet and run some software in their machines. One might come up with the question “what is the need for standard user accounts?”
There are 3 reasons behind the existence
- To make sure the system stays secure. If every user has admin privileges, it’s easier to break the system often and make the jobs of sys-admins miserable!
- There are plenty of offices where workers do their job in shifts and share the same computers, by making several of these standard user accounts, each user will have their own space to keep their files in.
Reason number 3 deserves its own section as that’s a special characteristic for the Linux operating system of letting multiple users use the machine at the same time!
Multiple users using the machine at the same time
In olden days, computers were very expensive and the way people used them is by having a single processing tower (CPU, RAM, hard disks, etc) and several users can log into these systems via their own monitor, keyboard, and mouse connected to the main processing tower. Each user can have their own login and password and they can enter their credential and login to the system and share it with several others simultaneously.
Those days are long gone but we still use the same principles of sharing on resources like network drives. Some organizations have special services like File servers where data can be stored and accessed from network directories and in these cases having several standard users and one admin can make sure that no one can delete important shared files, but everyone can view it and it also helps to log data about which user accessed what files and when a particular file was accessed so that the data is more secure.
This concept of sharing is also widely used in supercomputers and cloud processing these days!
Let’s next go ahead and learn about service users.
Service user
These users are not actual human beings, but actually some applications running on your system which need some permission to do some tasks. They are usually created most of the time you install apps that need some special privileges. If your organization’s security policy is of high level, then the admins will usually practice caution when it comes to installing software that needs to be a service user. As long as you only install apps from your distro’s official repos you need not worry about these service user accounts.
One major difference between service user accounts and the other accounts is the fact that service users cannot log into the machine!
Now that we understand the different types of users, let’s go ahead and have a look at the need for having user groups!
Need for Groups in Linux
What are groups in Linux and why do we need them? Groups are just another tool for organizing users in Linux. Instead of controlling access to resources like files and folders on the organization’s network it’s better to organize the users into groups for the ease of management.
Each organization is normally divided into subsections like sales, marketing, technical development and management. It’s in the nature of modern organizations to divide their workforce into teams where each team is responsible for a particular aspect of the organization’s work.
Example use case 1
Let’s say HR policy is anyone outside their team must not be able to look up personal info of the employees like home address, personal phone numbers, salary, etc. But setting up a separate network drive for them to share data among each other in the team is not the best idea economically. As it will add to the cost of the equipment and the System admins will have 2 networks to manage instead of 1 thus increasing their workloads also. instead it will be easier to organize the workforce into groups based on the teams they belong to and only give the HR team access to their files on the network drives.
Thus the concept of groups comes in handy when dealing with restricting a group of employees to one of several network drives. For example the sales team, marketing team and the HR team can have separate network drives in the file server and only personnel belonging to a given group can access the data on their network drive!
Example use case 2
Let’s take a look at another example where groups can be useful. Consider this situation, you are part of a very large organization that has about 200 employees working on the campus and your company has a sysadmin team of just 2 members. Now these admins will take their vacation at different times and hence it’s a good idea to give them both admin privileges in all 200 computers so that if one goes on vacation the other can solve any issues that come up.
Using the concept of groups, these 2 admins can be put into a single group and other standard users can be put into their own group. This way we can control the access and privileges of groups in general instead of doing it for individual users.
Alright I hope with those examples you have got a strong grasp of understanding the need for Linux groups. Next let’s go ahead and look at the 4 Main files related to User and Group management.
File#1: The “/etc/passwd” file
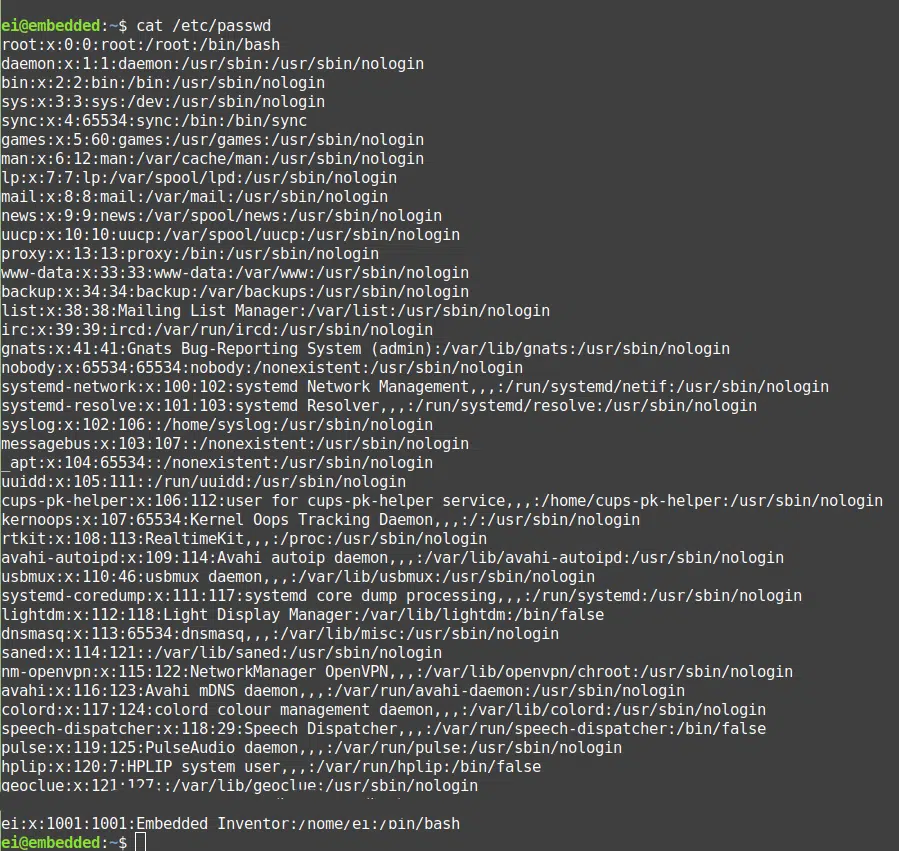
The etc/passwd file is shown in the screenshot above (obtained by typing the command cat /etc/passwd on the terminal) This file holds some data about each individual user (standard users, admins, root and service users) which can be listed as follows
- user name
- user ID
- groups the user belongs to
- IDs of those groups and
- their default shells
You can enter the commands below to have a look at the entry of a particular user.
# command to get the entry of a particular user in /etc/passwd file
cat /etc/passwd | grep <user name>
If you wish to know what your username is its usually the first word of the prompt before the “@” symbol, or you can always get it by typing the command “whoami” on the terminal.
When I typed in that command I got the results below.
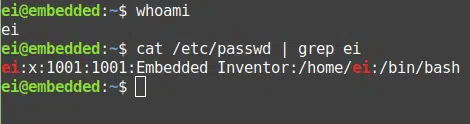
The various parts of the entry related to my username are separated using the “:” symbol in the screenshot above. The second “x” is just a placeholder for password hash to make this file backward compatible with older apps and scripts that use this file!
The first part is the username, followed by the placeholder x, followed by the user ID, group ID, User’s full name, home directory path and finally the default shell for the user.
What are User IDs and group IDs? How are they different from user and group names? In simple words, these are special numbers allocated to each user and group as their account is created. Computers like numbers more than names and hence Linux assigns us users with numbers to make its own processing simpler! These are similar to say your passport or ID card numbers!
Why can’t I see my password here? Isn’t passwd file supposed to store my password? It was originally used to store passwords, but then it was moved to the “etc/shadows” file as a simple security measure!
Also if you notice the result you will find plenty of users, most of these are service users apart from the root and very few human users. The service users can be identified using the last part of the default shell. These service users usually have “nologin” written at the end of their entries as shown in the screenshot below.
File#2: The “etc/shadow” file
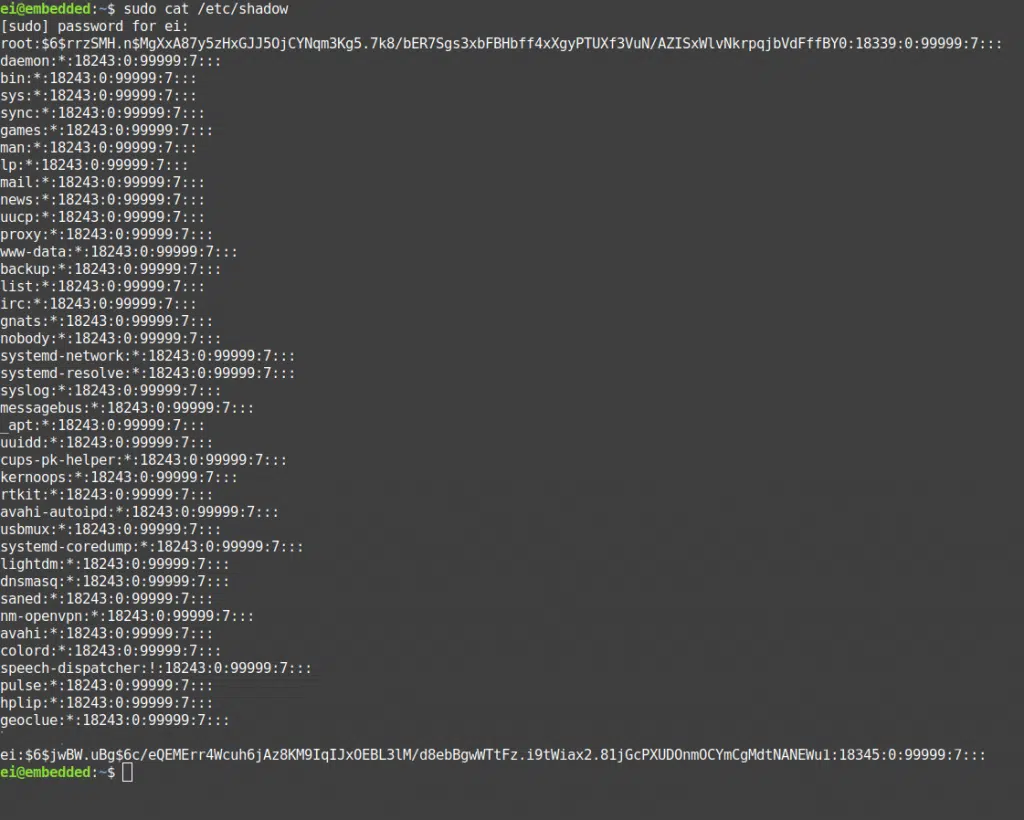
The above screenshot shows the contents of the /etc/shadow file obtained using the command below followed by your hashed password (assuming you have an admin account!).
sudo cat /etc/shadow
This file holds the password and other related information. You need to have root privileges to even view this file!
As you can see in the screenshot, the ultra-long gibberish next to my user name is the password I use to login to my system each time! Just kidding, that’s a “hashed value” of my actual password. I leave it to you to look up the concept of hashing algorithms if you are interested.
But basically the reason behind doing this is that only the Linux kernel can decrypt this hash into an actual password. Thus the policy of just showing the hashed value can ensure that even the sysadmins cannot view the passwords of regular users!
As with /etc/passwd file, you will find that most of the entries are in fact service users apart from the root and very few human users. The service users can be identified using their value for the hash, where usually there is a “*” instead.
The screenshot below shows the various parts of a given entry.

These fields are again separated using the “:” character. The fields included are listed below.
- username
- the hashed password,
- the password validity starting day (day 1 being the installation the epoch) and
- days since last password change
- the valid till day (9999 days is the default)
- warning time (7 days before the expiry the user will receive a warning).
- followed by the grace period after which the user account will be made inactive and
- finally the number of days the account has been disabled!
File#3: The “etc/group” file
The etc/group file can be viewed by typing the command “cat /etc/group” on the terminal. This file holds some data about each group which can be listed as follows
- group name
- group ID
- users that belong to that group
Similar to files 1 and 2, this one also has a majority of service users rather than human ones. This time since it is a group related file, we will use the terminology service groups instead of service users!
The trick to differentiate human groups from service groups is by simply looking at the last entry. Human groups will have human users associated with them and the service group users column will be usually left empty!
I hope soon Linux developers will make these files easier to read by moving service users/groups to their own files!
File#4: The “/home” directory
Everything is a file in Linux, even though from the user’s perspective /home is a folder, from a technical standpoint it is still a file!
This directory basically contains one directory per user for all the users of the machine. Each user can store their files and data under the folders that have their name and this is the default entry path when you open a terminal in your Linux machine and it has a special symbol “~” (tilde character, usually placed below the ESC button on keyboards) associated with it. You can go from anywhere in the file tree to your home directory by typing “cd ~“
Alright I will stop here for part 1. I hope this part has given you plenty of information to digest, go ahead to your computer and have a look at what is in the files mentioned above!
In the next part of this series let’s have a look at how to add a new user, set and reset his/her password and how to delete the user!
You can find the links to the next tutorials below, but before clicking that familiarize yourself with the concepts presented in this part 1 as we will be building upon these!
And with that, I will conclude this article!
I hope you guys enjoyed this article and learned something useful.
If you liked the post, feel free to share this post with your friends and colleagues!
I will see you in the next part!
Linux User & Group Management Tutorial Part 2: Adding, Modifying, and Deleting Users and Groups.
Related Articles
Here are some of my other articles that might interest you!
A Step By Step Plan To Learn Linux..!
Best Linux Distro For Workstation: Analysis and Comparison!!
A Complete Guide For Choosing A Distro For Your Computer’s Specs..!!
Best Distro For Software And Hardware Support: An Analysis.!!
Distro-Hopping, What, Why & How Explained!
Reasons Behind The Existence of SO MANY Linux Distros: An Analysis!