If you have just installed a guest OS like a Linux distro, Windows 10 or macOS on VirtualBox and you are hosting some network service on that virtual machine, then you need to configure some settings on the virtual box so that you can ping to that virtual machine and communicate with it over the network from any machine on your local network.
This article shows you the configuration changes you need to make on your virtual box in order to make it possible. I have written this article keeping complete beginners in mind, so instead of just answering the question “what to do to make it work?” I have also answered the questions “why it doesn’t work?” and “what is the reason behind the default settings?“
If you are an advanced user, or if you are just interested in the solution then feel free to just skip to section 5 “The short version of the answer” section using the table of contents below.
So let’s begin!
VirtualBox Basics
This section gets you introduced to the various terminology used in the rest of the article.
What is VirtualBox? VirtualBox is a hypervisor application that lets us host operating systems in a virtualized environment. In simpler words, its basically an app that runs on one operating system (The Host Operating System) and lets us boot other operating systems (Guest OS) as an app within the Host OS.
The Host OS can be Windows or Linux or Mac OS, and the guest can also be one of these. So if you have a Macbook and you wish to run some windows applications on it, which are not available for macOS, then you can run it by installing Windows inside VirtualBox.
Configuring VirtualBox
What are the configuration options available in a VirtualBox to share resources between Host and Guest OSes?
VirtualBox lets us allocate resources for the Guest OS. These resources include the following
- RAM
- CPU cores
- Hard Disk space
- Network
- USB devices, etc.
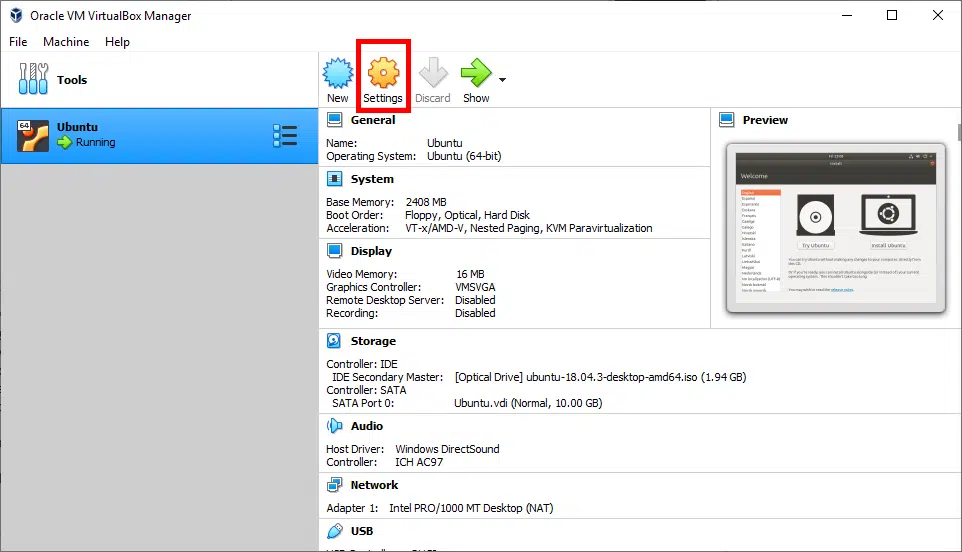
You can get to these options by clicking on the settings icon as shown in the image below.
![Oracle VM Virtua180x Manager
File Machine Help
Running
Nevv
Settings
Discard
IJbuntu
S prev,ew
Operating System: IJbuntu (64-bit)
Syste m
Base Memor y:
Soot Order:
Acceler a bon :
Display
Video Memory:
2408 MS
Floppy, Optcal, Hard Disk
VT-x/AMD-V, Nested Paging, KW Paravirtualizabon
Graphics Controller:
Remote Desktop Server:
Recor ding :
Sto rage
Controller: IDE
IDE Secondary Master:
Controller: SATA
SATA Port O:
VMSVGA
Disabled
Disabled
[Opbcal Drive] ubuntu-18.04.3-desktop-amd64.iso (I. 94 GE)
IJbuntu.vdi Clormal, 10.00 GE)
Host Driver: Windows Dir ectSound
controller: ICH Acg7
Network
Adapter 1: Intel MT Desktop(NAT)](http://embeddedinventor.com/wp-content/uploads/2020/01/image-1.png.webp)
Let’s assume your computer running the Host OS is a Windows 10 laptop that has a quadcore processor, 16GB of RAM and 1TB of hard disk space. If you wish to run Linux on it, you can tell the virtual box app to allocate it one of the CPU cores, 4GB of RAM and 25GB of hard disk space so that you can run both these operating systems smoothly and simultaneously.
If you wish to run more than one Guest OS, then that is also possible, you just need to have enough resources and allocate them to each of the Guest OS appropriately so that there are enough resources left for the Host OS, Windows 10 in our example, to run smoothly.
Other than CPU, RAM, and hard disk space, you can also allocate networking resources and USB devices to the guest OS.
Mouse and Keyboard will automatically be transferred to the guest OS as soon as you give focus to the virtual machine by clicking on it.
Assume you have another USB device that you need to use from the guest OS. Then using the configuration options, you can specify it in the settings so that the special USB device also transferred to the guest OS once you boot it up.
Now that we have seen the basic configuration options of VirtualBox, lets next look at the network configuration options, which is the main focus of this article.
Network Configuration Options in VirtualBox
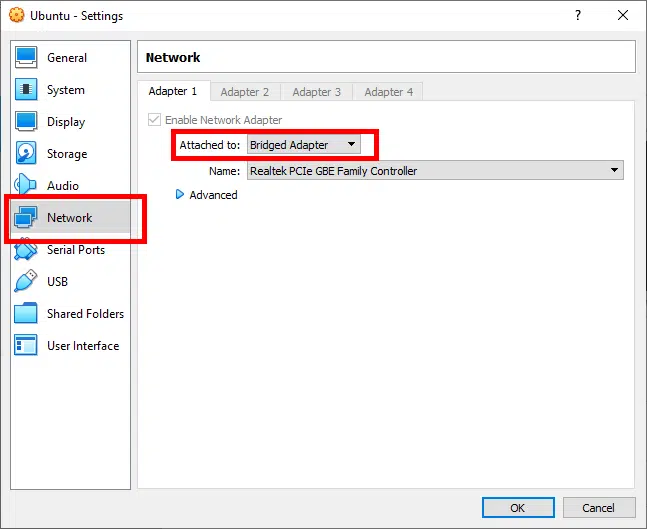
You can get to the network configuration options by clicking on the Network tab as shown in the picture below.

These are the default settings that VirtualBox provides you with once you install any Guest OS on it. As you can see the “Attached to” field is set as NAT.
Meanings of these Network Options
The table below shows the various available options for the Attached to field shown in the screenshot above and their meanings
| VM <-> Host | VM1<->VM2 | VM->Internet | VM<-Internet | |
| HostOnly | yes | yes | No | No |
| Internal | No | Yes | No | No |
| Bridged | Yes | Yes | Yes | Yes |
| NAT | No | No | Yes | Port forward |
| NATNet | No | Yes | Yes | Port forward |
From <https://forums.virtualbox.org/viewtopic.php?f=6&t=82939>
As you can see in the table above, for NAT option, there is no connection to the host (row 4, column 1). To understand why that is the case let’s see what NAT is, what is the need for NAT, how it works and what is the reason its chosen as default by the developers of VirtualBox.
NAT Basics
What is NAT? NAT stands for Network Address Translation. This is a protocol that is used on routers to translate between 2 sets of IP addresses namely public and private IP addresses. It does that using the concept of Port forwarding.
Need for NAT
As we know an IP version-4 address (ipv4) is 32 bits long. This means we can have up to 2^32 combinations, which comes to about 4,294,967,296 or 4 billion unique addresses. But since we are living in the internet age and each one of us has about 5 devices per person (office laptop, home laptop, mobile phones, smart TVs, desktops, tablets, etc) connected to the internet. Hence we need more than 4 billion addresses which is possible through ipv4. To overcome this issue, the engineers came up with ipv6 addresses, which are 64-bit address, so we can have around 18,446,744,073,709,551,616 devices. This number is more than the number of grains of sand in all the beaches all over the world so we should be good with ipv6 for the foreseeable future!
But like all technologies, adapting to ipv6 addresses is gonna take some time. This is where NAT comes in. If you go ahead and type in google what is my IP? You will see a result that is different than the one shown if you type in ifconfig command (if you are on Mac or Linux) or ipconfig (on windows) on the terminal.
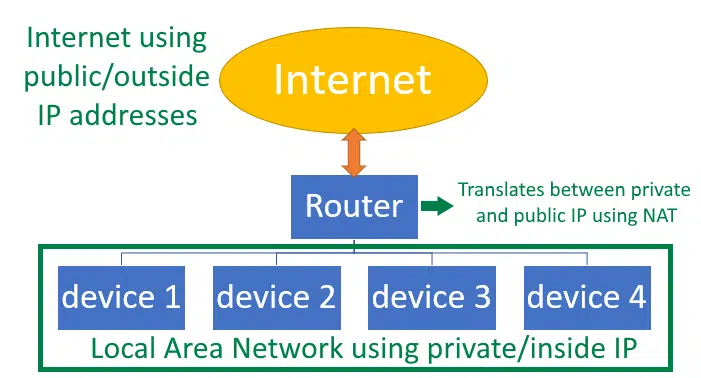
In fact, if you go to any device on your Local Area Network (LAN) and google what is my IP? you will get the same IP address for all of the devices. This is the IP address of the router device provided by your Internet Service Provider (ISP) and not your computer.
This is because in our networks we use 2 sets of IP address namely private IP address and public IP address. The router translates between the private and public IP addresses using the NAT protocol so that it can send the results of your google search to your computer and not to your colleague’s computer!
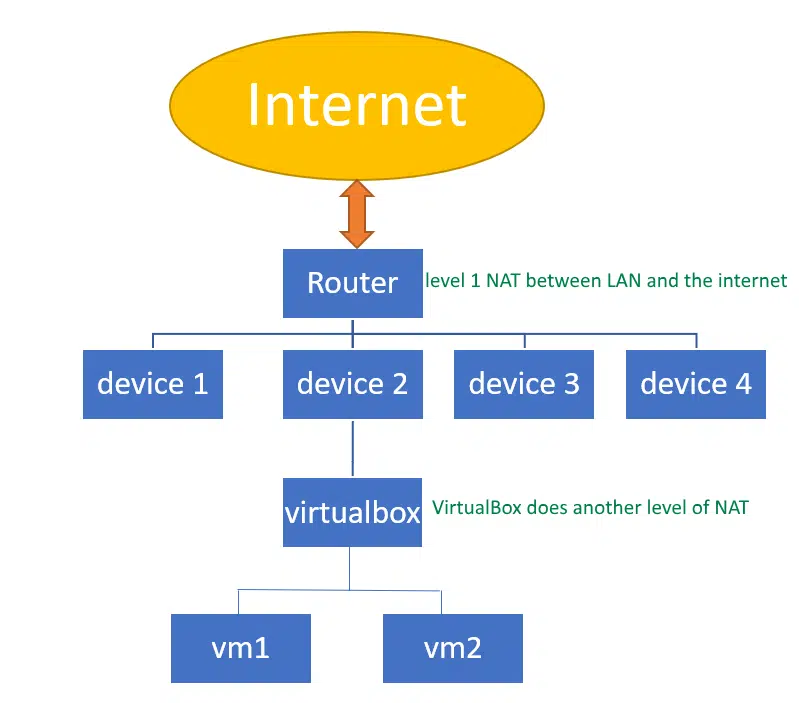
The image below shows the hierarchy of IP addresses and the use of NAT
How NAT works?
To explain how it works briefly, the router keeps track of which computer requested what resource with the help of something called address translation tables so that when a network packet is received from the internet it can send the received packets to the correct computer on your local area network.
I hope you understood the need for NAT and how it conceptually works. The exact mechanisms of NAT and its various types are beyond the scope of this article, so let’s stop here. I recommend you to do more research on it if you are interested.
The problem
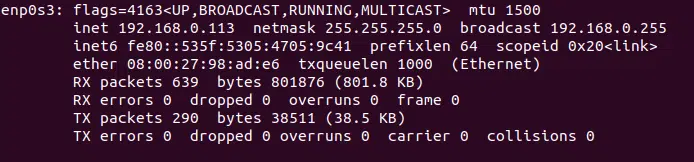
Keeping the default settings, I have booted up my ubuntu virtual machine and I got its IP using the ifconfig command as shown in the screenshot below.
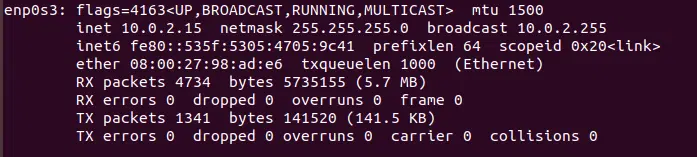
In Linux, the inet addr is the IP address.
When I try to ping to this IP from my host OS (windows10), I get the following results.
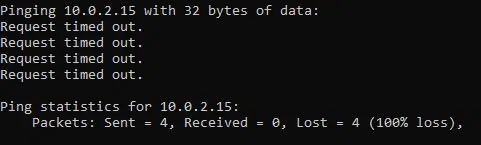
As we can see from the screenshot above, my host windows machine cannot see the virtual machine on my network.
Let’s try pinging the other way. I got the IP of my windows machine using the ipconfig command as shown in the screenshot below.
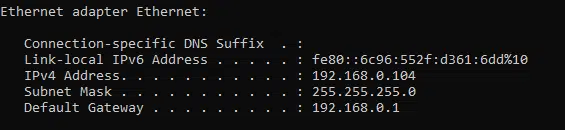
Then I tried pinging this IP from the guest OS and you can see the screenshot below.
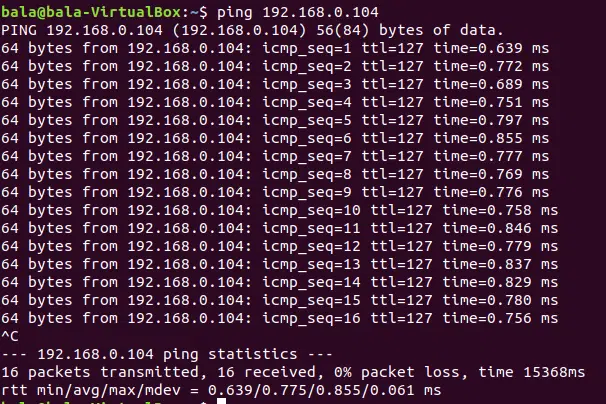
As you can see in the screenshot below, pinging from the guest OS to the Host OS is a success.
This is because VirtualBox uses the NAT protocol to translate between your Host OS’s IP and the Guest OS’s IP.
Reason only one side pinging works
Part of this NAT protocol is that NAT will only allow network traffic originated from the inner side of the NAT.
For example, when you open up your browser and go to google.com, you are sending a request to the google server from the inner side of the NAT (LAN side) and the router sends this request forward to the Google server which is in the outer side of the NAT (the internet) and once the server sends the requested page back, your router sends it back to your computer.
The diagram below shows the hierarchy of NATs in a typical network with devices being the physical computers and vm’s being the virtual machines running inside physical computers.
Reason NAT is chosen as default
In a typical organization, you can see several computers running multiple vm’s on each computer. They also usually have a strict networking policy to allow only authenticated devices to have access to the LAN for security reasons. If developers need to talk to network administrators every time they wish to make a virtual machine, then this process will get tedious for everyone.
Thus by using NAT, you can have as many virtual machines running as you desire and you are not using up any of the IPs in your LAN. In other words, VirtualBox attempts to create a sub-network under your local IP using NAT so that
- you don’t need to talk to your network admin every time you need to make a VM
- these machines stay invisible to the other devices on the LAN.
Need#2 for NAT
This brings us to the Need#2 of NATs, which is that nobody from outside your LAN can initiate a session with your computer and nobody from the internet can hack your computer.
Now let’s extend the analogy of the internet & LAN to your host & guest OSes. In the same way, you can initiate a session from your LAN to the internet but not the other way around, your guest OS can talk to machines on the outside of the NAT, in our case the Host OS, but not the other way around. I hope you got the point.
The Solution
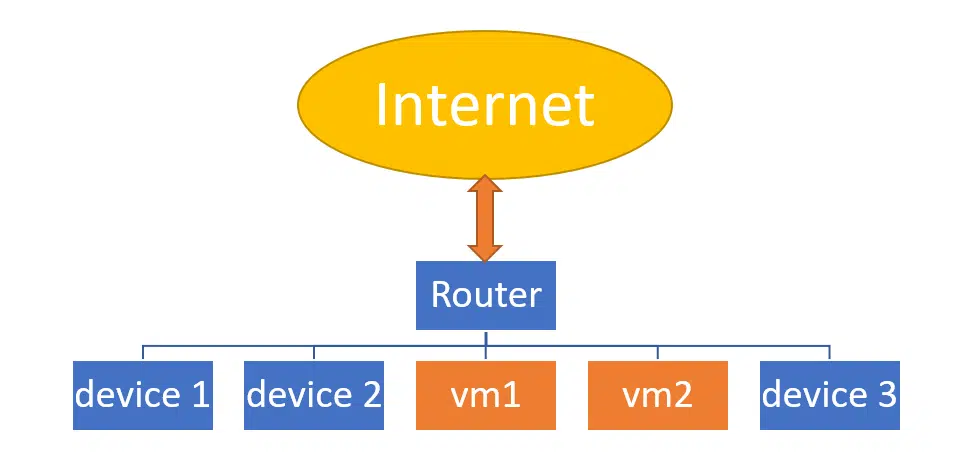
But what if you need to set up a network app like a web server or a file server inside the virtual box so that your colleagues can access it from their machines? Or maybe you need to log into your virtual machine remotely over SSH?
Then you need the virtual machine to act as a separate computer on the LAN as shown in the image below.
To achieve that, you need to change the option from NAT to Bridged Adapter as shown in the screenshot below.

After changing the settings again, I have booted up my ubuntu virtual machine and I got its IP using the ifconfig command as shown in the screenshot below.
Now to test if it works, go to the command line again and try pinging the IP to see if it works. When I try to ping to this IP from my host OS (windows10), I get the following results.
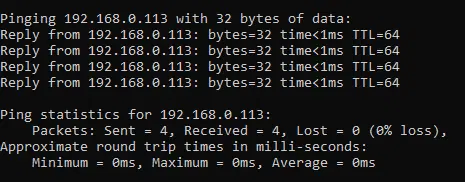
So now I can ping to my guest OS from my host OS.
Mission accomplished!!
The short version of the answer
To summarize the solution you need to follow these steps to be able to ping your virtual machine from any other device on your network
Step#1: Choose your virtual machine and click on settings
Step#2: Go to network settings

Step#3: Choose Bridged adapter
Step#4: Reboot the virtual machine
Step#5: Get the IP of the virtual machine and ping it to see if it works!
This is the easiest solution to just let the virtual machine be on the same level as other machines on your LAN. If you are doing this with your home network, it should work just fine. If you are doing it in your office be sure to check in with your network admin to make sure he opens up an IP for you if needed!
Did all the steps correctly and it still doesn’t work? then read on for some more settings you can change that might help make it work as you need it to.
Other settings that might help
1. Check your IP settings
Make sure they are in the same subnet and have the same DNS and gateway. If DHCP is enabled, then the virtual box should automatically get the correct IP settings(dns, gateway and ip addresses)
What is DHCP? DHCP stands for Dynamic Host Configuration Protocol. It’s a networking protocol that assigns IP settings to your device.
If it’s disabled on your guest OS, try enabling it and see if that solves the issues.
Since the process to change the DHCP settings on each OS varies a lot, I leave it to you to google and figure out how to change it.
2. Check your firewall
Configure firewall settings on the host OS to give all permissions to the virtual box app.
What is a firewall? It is a program that scans all the incoming network packers and only allows the ones as instructed by its settings.
I leave it to you to google and figure out how to do this for your specific Host OS.
3. Check your MAC address
MAC stands for Media Access Control, it is a unique address that is assigned to every hardware device capable of connecting to the internet.
Make sure that the MAC address as shown in the screenshot below is not a duplicate on your LAN. In other words, make sure that none of the other computers in your LAN has this MAC address.
![ubuntu server
General
System
Display
Storage
Audio
Network
Serial Ports
- Settings
Network
Adapter 1 Adapter 2
Z] Enable Net.work Adapter
Adapter 3
Adapter 4
Attached to:
Name:
Advanced
Adapter Type:
Promiscuous Mode:
MAC Address:
Bridged Adapter
Intel(R) Ethernet Connection 1219-LM
Intel PRO/IOOO MT Desktop (82540EM)
Deny
080027ACFA49
Cable Connected
Port Fomarding
Shared Folders
User Interface
Cancel](http://embeddedinventor.com/wp-content/uploads/2020/01/image-12.png.webp)
A couple more workarounds
Wordaround#1: Try enabling promiscuous mode
This mode basically skips the internal processing of received packets and sends all the incoming packets straight to the CPU.
This can be done by changing the settings of VirtualBox as below.
![ubuntu server
General
System
Display
Storage
Audio
Network
Serial Ports
Settings
Network
Adapter 1 Adapter 2
Z] Enable Net.work Adapter
x
Adapter 3
Adapter 4
Attached to:
Name:
Advanced
Adapter Type:
Promiscuous Mode:
MAC Address:
Bridged Adapter
Intel(R) Ethernet Connection 1219-LM
Intel PRO/1000 MT Desk-top (82540EM)
Allow All
080027ACFA49
Cable Connected
Port Fomarding
Shared Folders
User Interface
Cancel](http://embeddedinventor.com/wp-content/uploads/2020/01/image-13.png.webp)
But be careful as the promiscuous mode is set to deny for a good reason so that no one can hack into our machines. Make sure you don’t have sensitive data in your virtual box guest OS if you wish to turn it on.
You should be good to go as long as
- the router that connects your LAN to the internet has a good firewall and
- Your LAN does not have any hackers!
Wordaround#2: Try sharing a folder
The host/guest OS combination that this workaround is found to work in is shown below
Guest OS: Windows XP or 7
Host OS: Ubuntu
Add at least 1 shared folder from guest to host
But this is not the best solution since its not practical as it can get tedious to share a folder to all the present and future devices that might need to connect to your virtual machine’s network-based service.
If you wish to connect to just one or 2 machines then its worth giving it a try.
There are other ways to get it to work. For example, if your goal is to just connect to your VirtualBox using SSH and not let all other machines on your LAN see your virtual machine, then you can always open port 22 on the NAT settings and connect to it from the particular machine of interest and keep it hidden to all other machines. You can learn more about how to accomplish that at this link.
Bonus Tip
One more tip before I conclude this article! Try enabling hardware virtualization on your Host PC’s BIOS if it supports it, as this will increase the performance of your VirtualBox. You can google how to do this, by searching “how to enable virtualization in <your motherboard name>”
Alright, let’s stop here.
I hope you guys learned something through this post and hope it was useful to you guys.
You can email us or contact us through this link if you have any questions or suggestions.
If you liked the post, feel free to share this post with your friends and colleagues!