Introduction
In this tutorial, let us learn about the Documentation software Doxygen and see how to make use of it to make the job of producing documentation more automated and stress-free!
Let us start by looking at what Doxygen is.
What is Doxygen? Doxygen is a software used to produce documentation of source code written in C, C++, Python, Java, etc. and delivers in various formats like HTML, PDF, etc.
In other words, Doxygen is a software specifically made to fulfill the need for producing and maintaining documentation with as little effort as possible.
That is just the short version of the answer, read my other article for a longer and more informative answer where I try to answer the following questions
- Why you might need to use Doxygen?
- Is Doxygen the right choice for you?
- If no, then what are the alternatives available?
- If yes, then how to get started using Doxygen?
Here is the link again.
Doxygen, What is it? How it works?
In this article, our focus will be on how to get started to actually start using Doxygen.
Step 1: Download and install Doxygen on Linux
So head over to the Doxygen official website given in the link below and download the latest release of Doxygen.
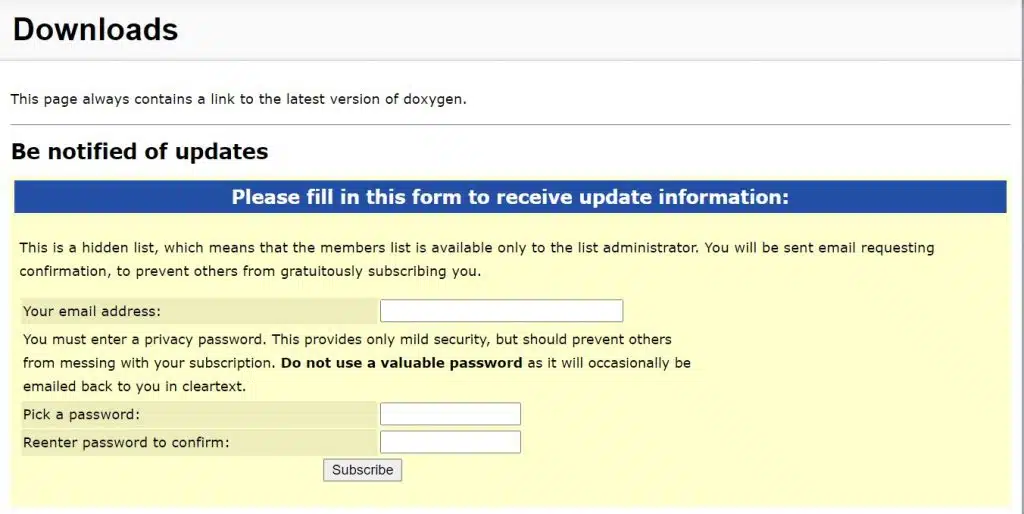
You can opt in for notifications regarding updates using the form shown in the screenshot below
If you scroll a bit down, you can find 2 ways to get Doxygen
- Download the source code from the git repository and build the executables yourself
- Download the Executable directly in .tar.gz format
Step 1.1: Download the .bin file and install
Let us first try method 2 and try and install Doxygen through the executable directly.
So scroll a bit down till you see something like it is shown in the screenshot below and click the link shown in the red rectangle that says “doxygen<version>.linux.bin.tar.gz”

Once downloaded extract the contents, navigate into the folder through your file browser, and right-click there and click open in terminal.
Or alternatively, you can open the terminal and cd into the extracted folder containing the make file with contents shown in the below screenshot.

From there, type the command
sudo make install
Enter the password when prompted and Doxygen should get installed into /usr/local as shown in the screenshot below.

Then type the command below to make the config file
doxygen -g
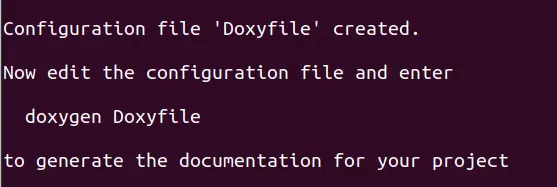
You should see something like shown in the screenshot above. If you get the error shown in the screenshot below instead, then some dependencies might not have installed correctly. The best way out of this mess is to compile the source code ourselves!

If you do not get this error, then go ahead to step 1.3
If you do get this error then perform the instructions in step 1.2 below
Step 1.2: Doxygen: Linux install and set up from Source
Enter the command given below to install the utilities needed to compile the Doxygen source code.
Command for Ubuntu, Debian and other distros that use “apt” for package management
sudo apt install build-essential xz-utils curl cmake flex bison git
Command for Fedora, CentOS and other distros that use “yum” or “dnf” for package management
sudo yum install build-essential xz-utils curl cmake flex bison git
or
sudo dnf install build-essential xz-utils curl cmake flex bison git
This will install the utilities below
- build tools
- xz-utils
- curl
- cmake
- flex
- bison and
- git
Explaining what do each of these utilities do is beyond the scope of this article, I suggest you to google the name of each of these utilities to get more information. Alternatively, you can also type “man <utility name>” on your Linux terminal to
Next cd into a folder of your choice and use the commands below to clone the Doxygen git repository and build the executables.
git clone https://github.com/doxygen/doxygen.git
cd doxygen
mkdir build
cd build
cmake -G "Unix Makefiles" ..
make
sudo make install
Once done, use the command below to generate the config file named “Doxyfile” on your present working directory.
doxygen -g
You should see something like this

Once you have got this, congratulations! You can go ahead to the next step to verify that everything is done correctly!
Step 1.3: Linux: Verify Doxygen installation
Give the command below to verify that the configuration file is successfully created!
cat Doxyfile
You should see a large file as below
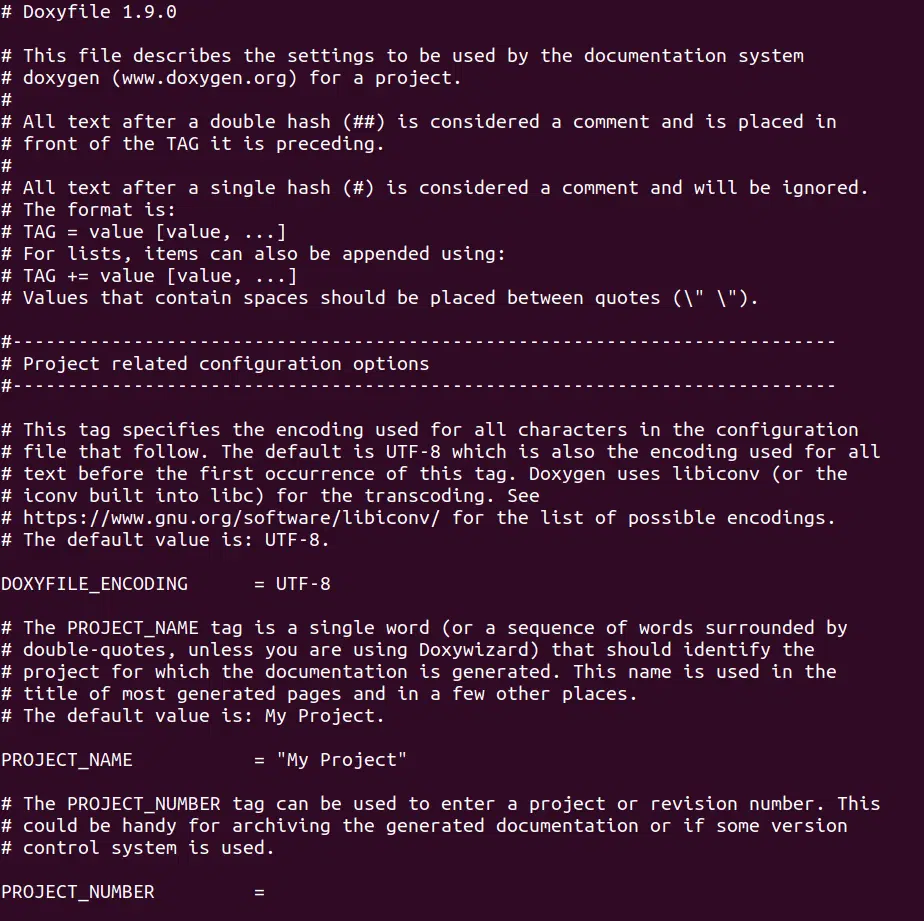
This is the file generated when you ran the command “doxygen -g” in the previous step. We will see how to make use of this file to run Doxygen in the next step!
Step 2: Learn How to Document the code using Doxygen
Doxygen works by taking the comments which are specifically formatted according to Doxygen’s pre-agreed syntax.
Doxygen calls these special syntaxes as “Tags”. Let us see some of those before we actually get into using them!
Doxygen tags and symbols to use in your comments
Doxygen supports several methods for incorporating documentation inside the comments. The 2 simplest methods to include in C source code are
/**
… comments…
*/
And
/// Comments.
Note the extra asterisk (*) in line 1 of the first option and extra slash symbol(/), (i.e. in C we just need 2 slashes for a comment line) These syntaxes are used to tell the Doxygen parser that it is documentation and it needs to be extracted.
The above 2 syntaxes must be placed just above an entity so that the Doxygen parser can associate the comments to that particular entity.
What is an entity in Doxygen? An entity can be a global variable, a structure declaration, enum declaration, or a function.

The entities and tags are implemented in code as shown in the screenshot above.
The Doxygen generated documentation from the code above will look like this

Next, let’s look at the documentation of parameters. Here another special Doxygen syntax is used which is the @ syntax.
Doxygen calls these structural commands. There are several of them and the most useful ones are the following.
| @file | The file name must be present in the file header for inclusion into the documentation generation process |
| @param | Parameter documentation for functions |
| @page | Markdown page name |
| @mainpage | Main markdown page for the project |
| @tableofcontents | Generates “table of contents” for the markdown page |
Let us see how you can use Doxygen entities to document your source code at various levels.
Step 2.1: File headers
File headers contain detailed description about a given file. This must be present at the top of every file which needs documentation. If there is no file header then Doxygen will not produce documentation for that file.
File headers look like this

Just use the Doxygen “structural command” @file followed by the file’s name, to tell Doxygen that you want this file to be included in the documentation generation process. You can also add some description about the file to be shown in the Documentation as shown in the screenshot below.
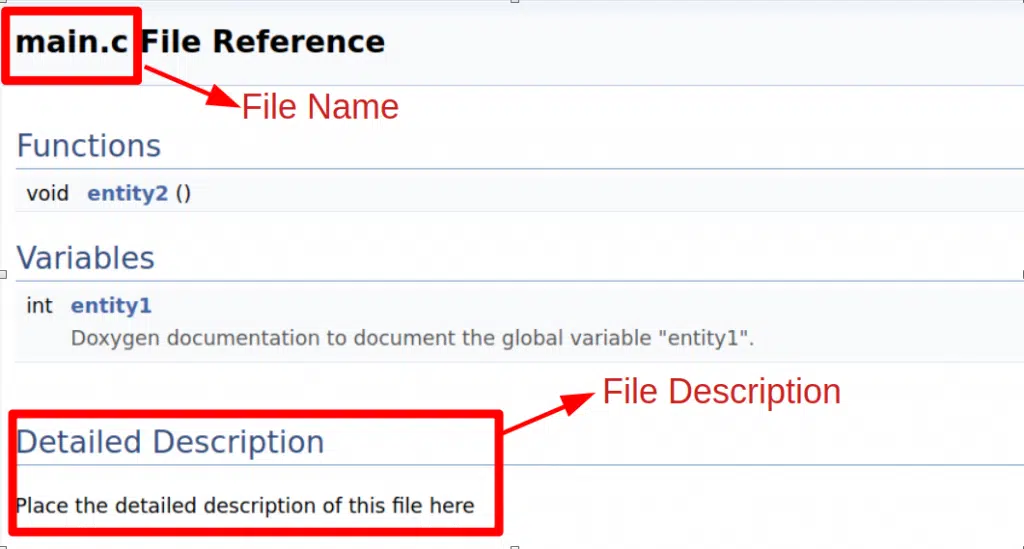
As you can see, the file name and description are placed on the documentation page generated for this example file main.c
Next lets us have a look at how to properly document functions and their arguments.
Step 2.2: Function Documentation
As we have seen above any function in a file can be documented by simply adding a Doxygen styled comment just above the function.
Next lets see how to describe the arguments and return values. Consider the following 2 functions

The syntax used in the parameter description is the following
@param[in/out] <variable name> <variable description>
Since the variable name radius is obvious to the reader of the code, I did not add the description. Please have a look at my other article “How To Use The Power Of Comments In Your Code The Right Way?” for guidelines on commenting.
The syntax used in the parameter description is the following
@param[in/out] <variable name> <variable description>
The output produced by doxygen using the syntaxes above will look like this
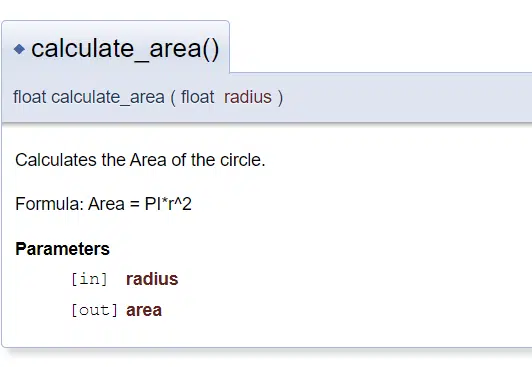
Step 2.3: Global Variables Documentation
We have seen how to document modules(files) and functions inside a given file, next let us see how to use doxygen to document other entities like global variable, constants etc.
As we have already seen in the beginning of step 2, a simple one line Doxygen style comment is enough to document a global variable. But some developers don’t like the idea of adding comments between each and every line of code in the global variable declaration section. To get around that problem Doxygen provides a second way of creating comments as shown in the screenshot below.


If you look at the code, you may have noticed that instead of keeping the comments on top of the entity I have kept it at the right-hand side of the macro definition.
Also instead of “/// “
I have used “///< “
This style can also be used to document more complex entities like structs and constants/macros as shown in the screenshots below.


The documentation produced by Doxygen will look something like this.
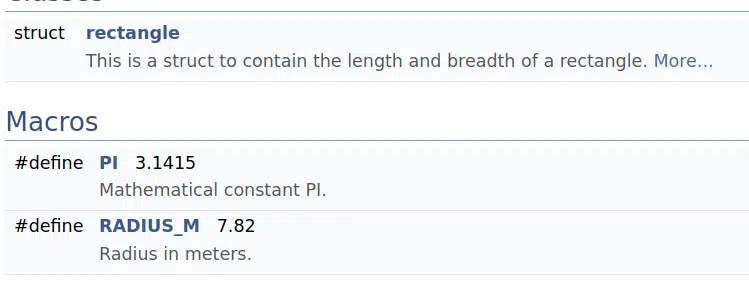
On clicking the “More..” in the screenshot above, you can get more documentation on the members of the structure like this
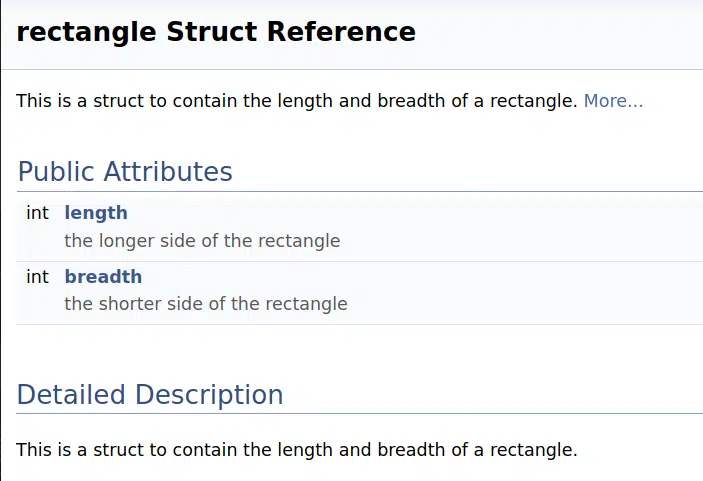
Step 2.4: Doxygen Pages
On Doxygen, we can also produce documentation pages which are not connected to any of our source files. These pages can be used to describe the project or individual modules.
Read the below sections to learn more about how to add pages in doxygen.
Page
These are the normal pages. These will show in the first level of pages on your left-hand side of the tree view. In a later section of this article, I have shown you how to enable “TreeView” which I think is better than the default view for C documentation.
The structural command to use for a Doxygen page is @page as shown in the markdown file below
| 12345 | @page module_name**Author:** Author name**Date:** Date## Module's RoleExplain the module's role in the system in general |
After running it through Doxygen the final output will look like this

Subpage
These pages will not be on the first level, rather it will be placed under another page.
The structural command to use for a Doxygen sub-page is @subpage. This @subpage should be used on the module’s page to which the given page is a sub-page to like this.
| 123456 | @page module_name Module Name@subpage sub_page_name**Author:** Author name**Date:** Date## Module's RoleExplain the module's role in the system in general |
The markdown file for the subpage will look like this
| 12 | @page sub_page_name Sub module Namesome text here explaining the role of the sub module |
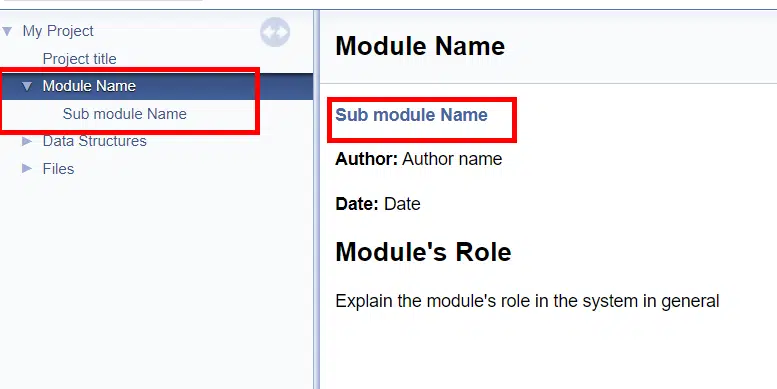
As you can see in the above picture, the Doxygen output has added the sub-page “Sub module Name” under the page “Module Name” on the tree-view at the left-hand side and added a link to it on our page.
The sub-page itself is an ordinary page and it looks like as it is shown in the image below.

I generally avoid sections and subsections as it increases the complexity of the documentation process. I like doing them with Markdown formatting options instead (even if that will make it hard to interlink a section with another one). I leave it up to you to decide for yourself if you need them in your particular project or not.
Step 3: Produce Documentation
Step 3.1: Configure Doxygen
There are several settings that can be configured to fine tune the output to just the way we want it to look like. These settings can be configured by editing the “Doxyfile” that you have generated in the beginning of the article in step 1.
For example consider the example below on how to create different levels of descriptions by tuning the settings of Doxygen.
Brief vs Detailed Descriptions in Doxygen
By default, the descriptions produced by are not divided into “Brief” and “Detailed”
Consider the code below.

Here the description of the entity 2 function has been expanded to have multiple lines. Now running doxygen with default settings will produce a page like this.

As you can see above, there is no documentation next to entity2 function like entity1 variable has.
By tuning the settings of Doxygen (I have explained exactly how to do this in the following section) you can make Doxygen parser to take the first sentence of the comment to be the brief description and the remaining sentences to be detailed description.

This can be done by setting the JAVADOC_AUTOBRIEF parameter to “YES” in the Doxyfile as shown in the screenshot below.

Just open the file named “Doxyfile” on your favorite text editor, find the line with the parameter “JAVADOC_AUTOBRIEF” and set that to YES.
After setting this parameter, Doxygen will takes the first sentence as a brief description and places it on the list of functions as shown in the screenshot above for easy referencing and it keeps the detailed description for the “More” section of the documentation as shown above!
This is just one of many configuration parameters available in Doxygen, as you would have seen when you opened “Doxyfile”!
To see an example of what more you can configure, I suggest reading the article below where I have explained how exactly to configure the Doxyfile to produce documentation for C programs.
Complete Guide On Using Doxygen To Document C Source Code..!!
I have also included the Doxyfile I have used for that project as a Download with that article so do check that out!
Now that we have covered how to configure Doxygen let us go ahead and see how you can run this program.
Step 3.2: Run Doxygen
As with any other command on Linux, all you need to do is call the doxygen executable from the command line and provide that with the a information of name of the configuration file to use as shown below.
$ doxygen Doxyfile
Once you run, you should see a long list of lines as output, ending with the line saying “finished…”
If you are getting the following error instead

then make sure you are in your correct project folder with all the source code and the Doxyfile (generated by running the “doxygen -g” command)
Once you have successfully completed this step, go ahead and open your project folder in a file browser and see that doxygen has generated a folder named “html” inside which lies all your documentation that you needed!
Open the “html” folder and double click on the “index.html” file to see all the documentation that has been generated by Doxygen for you!
I will stop here, hope you found this article useful!
Feel free to share this article with your friends and colleagues!
Here are some other articles that might interest you!
