In this article, let us learn about the ByteArray data structure in Python and learn how and when to use it in our Python programs.
For those of you in a hurry here is the short version of the answer.
ByteArray in a Nutshell
ByteArray is a data structure in Python that can be used when we wish to store a collection of bytes in an ordered manner in a contiguous area of memory.
ByteArray comes under binary data types.
You can use the bytearray() constructor to create a ByteArray object as shown below
>>> numbers = [1, 2, 3, 4]
>>> myByteArray = bytearray(numbers)
>>> print(myByteArray)
bytearray(b'\x01\x02\x03\x04')
Here the syntax we have used is
bytearray(iterable_of_ints)Depending on the type of data we wish to convert into an array of bytes, the ByteArray class gives us 4 different constructors are shown in the table below.
| Type of Data | Constructor |
|---|---|
| List of integers | bytearray(iterable_of_ints) |
| Strings | bytearray(string, encoding[, errors]) |
| Bytes | bytearray(bytes_or_buffer) |
| Empty Byte Array | bytearray() |
| Empty Byte Array of a given size | bytearray(int) |
Examples of how to use each one are given further down in the article.
The table below shows the most commonly used methods in the ByteArray class
| Method | Meaning |
|---|---|
| append() | Append a single item to the end of the bytearray |
| extend() | Append all the items from the iterator or sequence to the end of the bytearray. |
| insert() | Insert a given element at a specified index. |
| remove() | Remove the first occurrence of a value in the bytearray. |
| pop() | Remove and return a single item from B. |
| clear() | Remove all items from the bytearray. |
| copy() | Return a copy of the bytearray object |
| count() | Return the number of non-overlapping occurrences of a given subsection in bytearray |
| reverse() | Reverse the order of the values in bytearray in place. |
| find() | Return the lowest index where the given subsection is found. |
Examples of how to use these above methods, along with some more useful methods are given later on in the article.
If you are a visual learner, we made a YouTube video on ByteArray which you can find below!
If the above answer feels insufficient do not worry as this section was meant to be a quick reference for those who are already familiar with the topic. Read on for a more complete answer where we have explained everything you need to know about ByteArrays with the help of examples!
Feel free to skip to your topic of interest using the table of contents below.
What are ByteArrays and When to use them?
As explained previously, ByteArray is just a data structure in Python. Each data structure is useful in solving a particular kind of problem.
The ByteArray data structure is very useful when we wish to store a collection of bytes in
- an ordered manner and
- in a contiguous area of memory.
But when will the above properties of ByteArrays come in handy?
ByteArrays can be used in the following situations where we need to be sending and receiving
- numerical data
- string data
- images in RGB format and
- other binary files
via a communication channel like USB, Ethernet, Wi-Fi, etc. to another device.
For example, say you have a USB microphone recording. That microphone is sending in audio to your python script. You can receive such audio data in a ByteArray object and process it by decoding it.
Similarly, you can also use ByteArrays to send out audio to a loudspeaker.
ByteArrays can also be used as a buffer for sending data from your Python script to a Python library for data processing.
For example, say you are writing an image recognition library that processes images. As we know everything in computers is basically stored in 0’s and 1’s. You can receive these images as a ByteArray object and do the necessary processing.
ByteArrays are a good way to pack and process binary data.
This is because ByteArrays store the data given in a contiguous block of memory and hence are very efficient in the above scenarios when it comes to speed.
Discussion on “What ByteArrays are” is never complete without comparison with its cousin “Lists” which is what we will address next!
How ByteArrays differ from Lists?
Lists can have data placed in different areas of memory and this makes it very inefficient to transmit data. This is because we constantly need to update the addresses of where the next piece of data is and this will cause unnecessary delays in transmission.
ByteArrays, on the other hand, have their data placed in contiguous areas of memory and this makes it very efficient to transmit data, as we can simply increment the address to get the next byte of data
If the above explanation raises more questions than answers, I suggest you read our other article on lists given below.
Python Lists: Everything You Need To Know!
Now that we are talking about similar datastructures, it is worth mentioning the “immutable brother” of bytearrays, i.e the Bytes datastructure. As with Lists we have an entire article dedicated to Bytes which you can find in the link below.
Python Bytes: Everything you need to know!
If the term immutable feels new to you, I suggest heading over to our article that breaks down this concept of mutability and immutability for you. The link below will take you there!
Mutable and Immutable Data Types in python explain using examples
Now that we have learned what ByteArrays are and when to use them, let us go ahead and learn how to use the ByteArray data structure in our code!
Initializing a ByteArray object
ByteArray class gives us a variety of constructors to choose from depending upon the type of data we wish to store in our ByteArray object. They are listed in the table below
| Type of Data | Constructor |
|---|---|
| List of integers | bytearray(iterable_of_ints) |
| Strings | bytearray(string, encoding[, errors]) |
| Bytes | bytearray(bytes_or_buffer) |
| Empty Byte Array | bytearray() |
| Empty Byte Array of a given size | bytearray(int) |
Storing List of Integers (Iterable of ints)
Lists of integers can be used to represent not just Mathematical problems, but also multimedia data like audio, pictures, etc. This is because all data can be boiled down to a list of integers.
Hence integer-list is the most common datatype you will see being used with the ByteArray class.
You can use the bytearray(iterable_of_ints) constructor to create a ByteArray object from a list of integers as shown in the example below
>>> numbers = [1, 2, 3, 4]
>>> myByteArray = bytearray(numbers)
>>> print(myByteArray)
bytearray(b'\x01\x02\x03\x04')
As we can see,
- 1 becomes 0x01
- 2 becomes 0x02
and so on!
Here the syntax we have used is
bytearray(iterable_of_ints)Let us take another quick example to learn an important concept
>>> myNumberList = [1, 2, 3, 300]
>>> bytearray(myNumberList)
Traceback (most recent call last):
  File "<stdin>", line 1, in <module>
ValueError: byte must be in range(0, 256)
This time our program crashed with an error.
So why the list [1, 2, 3, 4] work but the list [1, 2, 3, 300] doesn’t work?
This is because a single byte can only contain integers in the range (0, 255) and the integer 300 is outside this range.
Hexadecimals and Bytes
1 Byte = 8 Bits
and 8 bits can be arranged in 28 = 256 different combinations which give us numbers from 0 to 255.
- 0 = 0x00
- 1 = 0x01
- 2 = 0x02
- .
- .
- 255 = 0xFF
If you find this concept hard to grasp I recommend researching and learning how hexadecimal numbers work.
Now that we have covered how to convert the most common type of data, i.e. integers to ByteArrays, next let us address the 2nd most common datatype: “Strings”!
Storing a String
When working with strings we can use the following syntax to create the byte array from a string.
bytearray(string, encoding[, errors])For example
>>> bytearray('Python','utf-8')
bytearray(b'Python')
Here the string “Python” is encoded using the “utf-8” encoding and then passed into the bytearray.
How does encoding work?
As we know computers treat everything as 0’s and 1’s. So to represent the letter ‘A’ we can use the byte 0x41, ‘B’ with 0x42, and so on as shown in the table below.
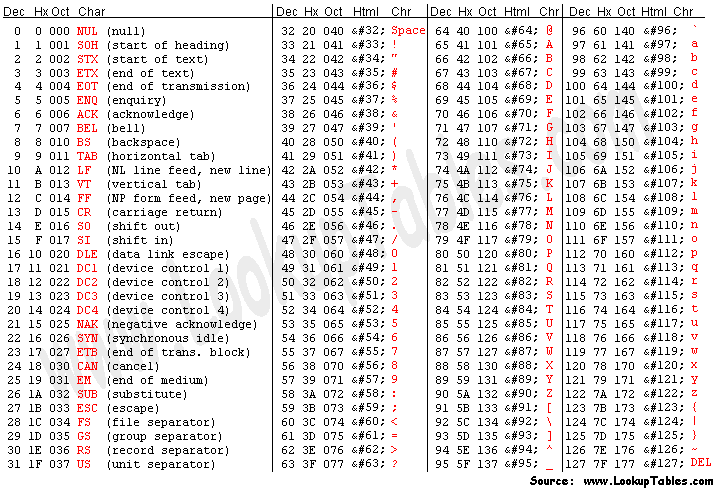
This type of mapping integers to characters is called ASCII encoding. But it is not the only encoding available out there. The latest ones are utf-8 and utf-16 encodings which simply use different numbers to map to different symbols.
Covering different types of encoding is out of the scope of this article, so if you are interested to learn more, I suggest googling!
Let us take another example to see how to use the “errors” parameter.
>>> bytearray('The price is 100€','ascii', 'replace')
bytearray(b'The price is 100?')
Notice I have used the Euro character “€” which is not part of ASCII encoding and it got replaced with the “?” (question mark) symbol.
The most common options for the “error” parameter are shown in the table below.
| Value | Meaning |
|---|---|
| strict | Throw an exception in case of error (default behavior) |
| ignore | Ignore the character which could not be encoded |
| replace | Replace the character using the question mark “?” symbol (shown in the example above) |
The code below shows the usage of “ignore” and “strict” options
>>> bytearray('The price is 100€','ascii', 'ignore')
bytearray(b'The price is 100')
>>> bytearray('The price is 100€','ascii', 'strict')
Traceback (most recent call last):
  File "<stdin>", line 1, in <module>
UnicodeEncodeError: 'ascii' codec can't encode character '\u20ac' in position 16: ordinal not in range(128)
As you can see,
- when we use the ignore option, the character which cannot be encoded, the “€” symbol is simply ignored
- when we use the strict option, we get an error!
If you wish to see more examples on how to use strings with ByteArrays, head over to the article linked below.
Using Strings With ByteArray in Python
Now that we have learned how to use the string constructor of the ByteArray class, next, let us have a look at how you can convert an object of the Bytes class into ByteArray class.
Converting Bytes into ByteArray
Let’s assume you are working with a read-only image and you wish to modify it, then first you need to make an editable copy. Situations like this are where our next constructor comes in.
As mentioned previously, the Bytes class is just an immutable version of the ByteArray class, i.e. an object of the Bytes class cannot be modified once created.
This is illustrated in the code below.
>>> mybytes = bytes([1, 2, 3, 4])
>>> mybytes
b'\x01\x02\x03\x04'
>>> mybytes[2] = 4
Traceback (most recent call last):
  File "<stdin>", line 1, in <module>
TypeError: 'bytes' object does not support item assignment
>>> myByteArray = bytearray(mybytes)
>>> myByteArray[2] = 4
>>> myByteArray
bytearray(b'\x01\x02\x04\x04')
Here
- we have a bytes object named mybytes
- if we try to change the 2nd byte we get a TypeError with the error message ” ‘bytes’ object does not support item assignment”
- so we make an editable copy using ByteArray class
- then we can edit the array
Here the syntax used is
myByteArray = bytearray(mybytes)You can find a comprehensive comparison between the 2 datastructures here
bytearray vs bytes, Similarities & Differences Explained!
So far we have constructed ByteArray object from already available data, to end this section let us see how to create an empty ByteArray object to which we can add stuff later on.
Creating Placeholders
If we wish to create an empty ByteArray class without any elements you can use the following syntax
>>> myEmptyArray = bytearray()
>>> myEmptyArray
bytearray(b'')
As you can see the array is empty.
If we wish to create a ByteArray class with X number of elements all initialized to zeros, we can use the following syntax
>>> myArray = bytearray(10)
>>> myArray
bytearray(b'\x00\x00\x00\x00\x00\x00\x00\x00\x00\x00')
As you can see the array has 10 bytes, all of which are zeros.
Now that we have learned how to create/construct ByteArray objects, the next step is to learn how to manipulate values in an existing ByteArray object.
Manipulating contents of a ByteArray object
Accessing items in a ByteArray object
We can access the elements of the bytearray using the index operator, i.e. the square brackets “[ ]”. The index always starts from 0 and the index of the last element is the total number of elements minus 1. Hence accessing elements of ByteArray class works the exact same way as the Lists class.
Let us see a simple example
>>> mybytearray =  bytearray([0, 1, 2])
>>> print(mybytearray[1])
1
Here the value at index-1 is the integer 1 and hence it is printed.
We can use the same syntax to modify elements if needed
>>> mybytearray =  bytearray([0, 1, 2])
>>> mybytearray
bytearray(b'\x00\x01\x02')
>>> mybytearray[1] = 3
>>> mybytearray
bytearray(b'\x00\x03\x02')
As you can see, we have changed the element at index-1 to 3.
Let us next see how to
- add elements
- remove elements and
- make a copy of a ByteArray
If you are familiar with Lists then all the methods mentioned in this section will be very familiar to you.
Adding Elements
ByteArray provides 3 methods for adding elements to an existing ByteAray object. They are
- append() method
- extend() method and
- insert() method
The append() method
To add an element to the end of a ByteArray, we use the append() method as shown in the following example
>>> myArray = bytearray([1, 2])
>>> myArray
bytearray(b'\x01\x02')
>>> myArray.append(3)
>>> myArray
bytearray(b'\x01\x02\x03')
As you can see the element “3” got added to the end of our array.
The syntax to use with the append() method is
arrayName.append(element)The extend() method
If we wish to add all the elements of one ByteArray object to another ByteArray object we use the extend() method as shown in the following example
>>> myArray
bytearray(b'\x01\x02\x03')
>>> myOtherArray = bytearray([4, 5, 6])
>>> myOtherArray
bytearray(b'\x04\x05\x06')
>>> myArray.extend(myOtherArray)
>>> myArray
bytearray(b'\x01\x02\x03\x04\x05\x06')
As you can see, all the elements from myOtherArray (“4”, “5”, and “6”) got added to the end of the 1st array.
The syntax to use with the extend() method is
arrayName.extend(otherArrayName)You can find more examples for append() and extend() methods in the following article.
ByteArray: Append & Extend, Explained with Examples!
The insert() method
If we wish to add a specific element at a particular index then we can use the insert method as shown in the following example.
>>> myArray = bytearray([1, 3])
>>> myArray
bytearray(b'\x01\x03')
>>> myArray.insert(1, 2)
>>> myArray
bytearray(b'\x01\x02\x03')
As you can see element “2” is inserted at index-1 between elements “1” and “3”.
The syntax to use with the insert() method is
arrayName.insert(index, element_to_insert)Removing Elements
The ByteArray class gives 3 methods for removing elements from ByteArrays. They are
- remove() method
- pop() method and
- clear() method
The remove() method
The remove() method removes the 1st occurrence of a given element from the ByteArray object as shown in the following example.
>>> myArray = bytearray([1, 2, 3, 1])
>>> myArray
bytearray(b'\x01\x02\x03\x01')
>>> myArray.remove(1)
>>> myArray
bytearray(b'\x02\x03\x01')
If you look closely you can see only the first “1” is removed and not the 2nd one.
The syntax for the remove() method is
arrayName.remove(element_to_remove)But what if we wish to remove the 2nd “1” instead of the 1st? That is where the pop() method comes in!
The pop() method
The pop() method deletes the element at the specified index from the ByteArray object as shown in the following example.
>>> myArray = bytearray([1, 2, 3, 1])
>>> myArray.pop(3)
1
>>> myArray
bytearray(b'\x01\x02\x03')
As you can see, “1” which is the element at index-3 is removed and returned after calling the pop() method leaving just “1”, “2” and “3” in myArray.
The syntax to use with the pop() method is
arrayName.pop(index)If the index is not provided, the last element of the ByteArray is removed and returned. I leave it to you to experiment and see what happens when the pop() method is used without an index!
Advanced: What does “pop” mean?

The word “pop” comes from the sound made by the cork as you open a bottle like the one in the pic above.
I assume you have played the game of “Jenga”. If you are sliding a block “in”, we call that “pushing” and whenever you take a block “out” we call that “popping”.

But how does that relate to python lists? Similar to the blocks of wood, the items in the list are stored blocks of memory locations. Hence we use the word “pop” to refer to a situation where we take items out of those memory locations!
The clear() method
The clear() method clears all the elements from the ByteArray object making it empty as shown in the following example.
>>> myArray = bytearray([1, 2, 3])
>>> myArray
bytearray(b'\x01\x02\x03')
>>> myArray.clear()
>>> myArray
bytearray(b'')
As you can see, after the call to the clear() method, myArray() has no elements left!
The syntax to use with the clear() method is
arrayName.clear()Copying ByteArrays
If you are new to python, if you wish to create a copy, intuitively you will try something like this
>>> myOriginal = bytearray([1, 2, 3])
>>> myCopy = myOriginal
>>> myOriginal
bytearray(b'\x01\x02\x03')
>>> myCopy
bytearray(b'\x01\x02\x03')
The problem with this method is we are not creating a copy, instead, we are just making 2 names for the same object, so if we change one the other will also change as shown below.
>>> myOriginal[2] = 1
>>> myOriginal
bytearray(b'\x01\x02\x01')
>>> myCopy
bytearray(b'\x01\x02\x01')
So if we really wish to create a copy we need to use the copy() method which will return a copy of the given ByteArray as shown below.
>>> myOriginal = bytearray([1, 2, 3])
>>> myCopy = myOriginal.copy()
>>> myOriginal
bytearray(b'\x01\x02\x03')
>>> myCopy
bytearray(b'\x01\x02\x03')
>>> myOriginal[1] = 0
>>> myOriginal
bytearray(b'\x01\x00\x03')
>>> myCopy
bytearray(b'\x01\x02\x03')
As you can see we used the copy() method and now we can edit each copy independently.
The syntax to use with the copy() method is
myCopy = myOriginal.copy()Now we know how to create and manipulate ByteArrays, the next step would be to learn how to loop through elements of a ByteArray object.
Looping through a ByteArray Object
Since ByteArray is iterable, we can iterate over it using loops just like any other iterable like Lists as shown in the following example.
myByteArray=bytearray([1,2,3,4,5])
for byte in myByteArray:
    print(byte)
This will give the following output
1
2
3
4
5
Nice and simple!
Methods in a class are like spells in magic, if we learn some it will definitely make our life easier. Let us go ahead and learn some methods/spells that come with the ByteArray class!
Other Useful ByteArray Methods
The count() method
The count() method returns the number of non-overlapping occurrences of a given subsection in
ByteArray.
In simpler words, we can get the number of times a sequence of bytes occurs within a given ByteArray using this method.
>>> myArray = bytearray('abcd abc', 'ascii')
>>> sequence_to_search = bytearray('abc', 'ascii')
>>> myArray.count(sequence_to_search)
2
As you can see, there are 2 ‘abc’ s in the string ‘abcd abc’ and hence we get the output as 2.
Make sure that the sequence we are searching for is also in the same ByteArray or Bytes format.
The syntax used with the count method is
arrayName.count(sequence_to_search)The reverse() method
As the name suggests, the reverse() method is used to reverse the byte arrays in Python.
>>> myByteArray=bytearray([1,2,3,4,5])
>>> mybytearray
bytearray(b'\x01\x02\x03\x04\x05')
>>> myByteArray.reverse()
>>> mybytearray
bytearray(b'\x05\x04\x03\x02\x01')
As you can see the order of the bytes has been reversed!
The syntax to use with the reverse() method is
arrayName.reverse()The find() method
The find() method finds the first occurrence of the byte given to it. For example
As you can see, the element “3” is at index-2, and hence find() returns 2.
>>> myByteArray=bytearray([1, 2, 3])
>>> myByteArray.find(3)
2
If the element is not present in the given ByteArray object, the find() method returns -1 as shown below
>>> myByteArray=bytearray([1, 2, 3])
>>> mybytearray.find(4)
-1
There is another method named index() which works almost the same as the find() method. The only difference between find() and index is that while find() returns -1 when the item is not found, the index will throw an exception instead as shown below.
>>> myByteArray=bytearray([1, 2, 3])
>>> mybytearray.index(3)
2
>>> mybytearray.index(4)
Traceback (most recent call last):
  File "<stdin>", line 1, in <module>
ValueError: subsection not found
Next, let us have a look at some ASCII-related methods.
The isdigit() method
This method is used to check whether the string contains only digits or not. For example
>>> myByteArray=bytearray('123', 'ascii')
>>> myByteArray.isdigit()
True
Here the string ‘123’ is a digit and hence we got True as a result.
The isalpha() method
This method is complementary to the isdigit() method and it checks if the string is only made up of alphabets as shown below.
>>> myByteArray=bytearray('python', 'ascii')
>>> myByteArray.isalpha()
True
As you can see, the string ‘python’ is only made up of alphabets and hence we got True as output.
So what will happen if a mixture of digits and alphabets are given to isalpha() method or to isdigit() method? I leave it to you to experiment and figure it out!
The istitle() method
This method checks whether a given text is in Title Case (each word starts with an uppercase letter, and the rest of the words are in lowercase) as shown below.
>>> myByteArray=bytearray('Python Is Awesome', 'ascii')
>>> myByteArray.istitle()
True
>>> myByteArray=bytearray('Python is awesome', 'ascii')
>>> myByteArray.istitle()
False
As you can see the 1st string returned True and the 2nd string returned False.
The lower() method
As the name implies, this method returns a ByteArray object with all the characters transformed to lowercase as shown below.
>>> myByteArray=bytearray('PYTHON Is awesome', 'ascii')
>>> myByteArray
bytearray(b'PYTHON Is awesome')
>>> myByteArray.lower()
bytearray(b'python is awesome')
With that example, I will end this article!
I hope I was able to quench your thirst for knowledge about the ByteArray class and I hope you found this article useful!
Feel free to share it with your friends and colleagues.
Here are some more articles from our website that might interest you.
Thanks to Sarthak Jaryal for his contributions to writing this article.
Related Articles
Python Bytes: Everything You Need to Know!