
In this tutorial let’s have a look at how to add a Linux user to multiple groups. If you are a beginner to user and group management I suggest reading my other tutorial that covers all the essential basics in the link below.
Linux User & Group Management Tutorial: Part 1: Basic Concepts
For those of you who are in a hurry, this is the short version of the answer!
The Short Answer
To add a user to groups that he is not yet part of you must use the command
sudo usermod -aG <new group name> <username>
For example, the screenshot below adds testuser1 to testgroup1
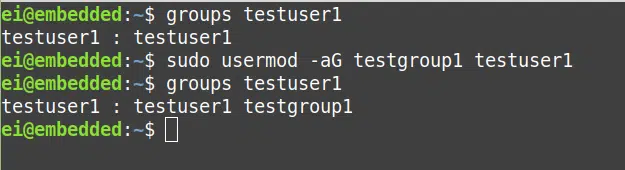
The command in the 3rd line in the above screenshot is the one you will need. The command groups testuser1 simply demonstrate this addition of group to testuser1
Okay now that we have seen the short version, let’s go ahead and have a look at the longer and more informative version of the answer next so that you can actually understand what happens behind the screen and that way you don’t have to memorize the command but you will actually remember it without trying!
If you are interested in a particular topic, you can skip to it using the table of contents below. Okay so let’s begin!
Need for adding the same user to multiple groups
The hierarchy of modern office environment is not simple anymore. Whichever company you are working for, the odds are you will find employees doing a bunch of different projects, and hence those employees belong to multiple teams/groups and need access to multiple sets of data.
For example, a project manager may be involved in multiple projects at a time and also be a part of the management. Hence he/she needs to be able to access all of the projects and also needs access to data that the management team uses.
In that case it makes sense to have a feature that will let us add those employees to all those groups and Linux has that functionality built-in. Graphical tools are usually built keeping beginners in mind and hence they only have the features to accomplish the simplest of tasks. In order to do the task we have in our hands, we need to go into the Linux terminal instead!
Let’s see how to do that in this tutorial!
The usermod command
The command to use to add a user to multiple groups is the usermod command. usermod stands for user modification and this command can be used to accomplish a bunch of different tasks like
- changing the user-related configuration parameters,
- locking and unlocking users,
- adding and removing groups that the user belongs to,
- changing their home directory,
- changing their default shell, etc.
The man page for the usermod command can be seen in the screenshot below. (to get this page type man usermod on your terminal)

Each of these options will help us do a specific task. The 2 options we are interested in are “-a” option and the “-G” option. These 2 options, when used together, will let us add a particular user to more groups than he already belongs to.
Let’s go ahead and test the command to make sure it works!
Testing the command
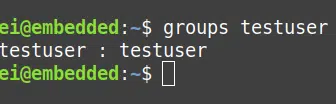
Let’s begin by creating a user named testuser for the purpose of this tutorial.

As you can see the testuser, by default is added to the testuser group as shown in the screenshot below. (the group <username> command can be used to view the groups a particular user belongs to)
Next let’s create 2 new groups named testgrp1 and testgrp2.

Now let’s go ahead and add our testuser to these 2 newly created groups using the usermod command and the -aG options
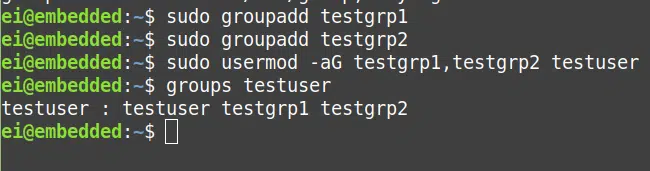
And Voila! now the testuser belongs to 3 groups instead of 1!!
You can also verify the contents of /etc/group just to make sure

As you can see now testuser is part of 3 groups namely testuser, testgrp1 and testgrp2!
If the above does not work for you make sure you have not left space in between the group names as the syntax expects just a comma separator.
How to delete a group that a user belongs to
Okay so we have now learned how to add a group to a given user. What about deleting a user from a group? Obviously you can go ahead and edit the /etc/group file and delete the user, but that not the best way of doing it as you may break the file as you edit it! If there is an option to do it via a command always take that option, as any given information may need to be present in multiple files in Linux and editing a bunch of those always has the danger of missing one or 2 and leaving a broken system!
So for this we will use the usermod command again! This time with just the -G option! The process I recommend has 2 simple steps.
- get the groups that the given user belongs to using the groups <user name> command.
- Once you are done with that, you can add all the groups except the one you want to remove the user from and pass that with the -G option and you are done as shown in the screenshot below.
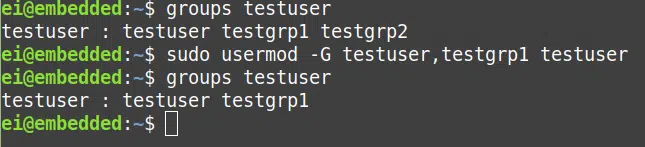
Here I have removed the user from testgrp2.
Reading in-built Documentation
I highly recommend getting used to reading the manual for these commands so that you will feel more comfortable using the command line! Next time before googling for answers, just type man <command name> and read the resulting page before you start searching for answers online.
If man pages feel cryptic then try the command info <command name> as these info pages are usually more verbose and you will understand them better! (though for some command the same text will be provided for both man and info pages!) If you have never read man pages before, I suggest starting with some familiar commands like ls and cd, so that you can understand the pattern of these files. Once you understand these patterns if you look at a man page for an unknown command you will feel more at home!
If you are interested in learning more about Linux, be sure to check out my step by step plan to master Linux here.
And with that, I will conclude this article!
I hope you guys enjoyed this article and learned something useful.
If you liked the post, feel free to share this post with your friends and colleagues!
Related Articles
Here are some of my other articles that might interest you!
Linux User & Group Management Tutorial: Part 1: Basic Concepts
Linux User & Group Management Tutorial Part 2: Adding, Modifying, and Deleting Users and Groups.
A Step By Step Plan To Learn Linux..!
Best Linux Distro For Workstation: Analysis and Comparison!!
A Complete Guide For Choosing A Distro For Your Computer’s Specs..!!
Best Distro For Software And Hardware Support: An Analysis.!!
Distro-Hopping, What, Why & How Explained!
Reasons Behind The Existence of SO MANY Linux Distros: An Analysis!